
The Workshop: PROJECT KANGURO
The hardest part of Rupert’s Morini overhaul? It turns out to be removing the exhaust system. Although the gear linkage causes frustrations too
PHOTOGRAPHY: RUPERT PAUL
Rupert Paul
1981 Moto Morini 350 Kanguro
Former Performance Bikes magazine editor and motorcycle rewiring specialist Rupert has crossed over to the wonderful world of classics with a BSA 650 Thunderbolt and a recently-acquired Morini trail bike.
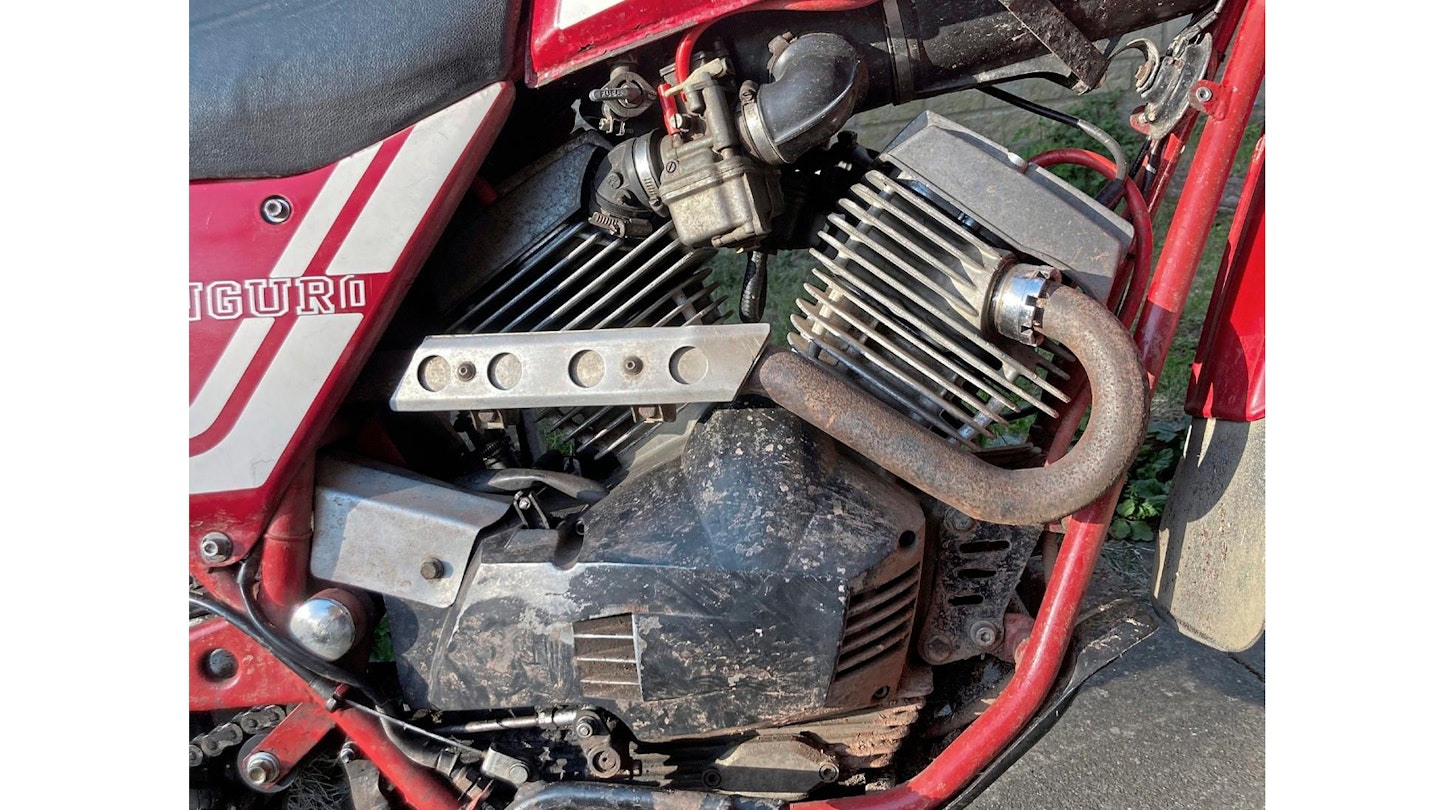
In the April issue, I airily claimed I had sorted out the wiring on my newly-purchased 1981 Morini Kanguro 350, and was moving on to tackle the smoky engine. I also predicted that the whole bike would be ready in time to take part in April’s Lands End Trial.
Benjy Straw, the Gandalf of Morinidom, was pretty sure the engine smoke was nothing more than rings. With a workshop (and work ethic) unsuited to oily delvings, I had no intention of finding out. So I offloaded responsibility to my friend Rupe Farnsworth. If you’ve ever read the children’s book Uncle by JP Martin (and you should), you’ll know the One-Armed Badger, whose chief characteristic is a boundless enthusiasm for carrying heavy loads. Farnsworth is like that – but with engines.

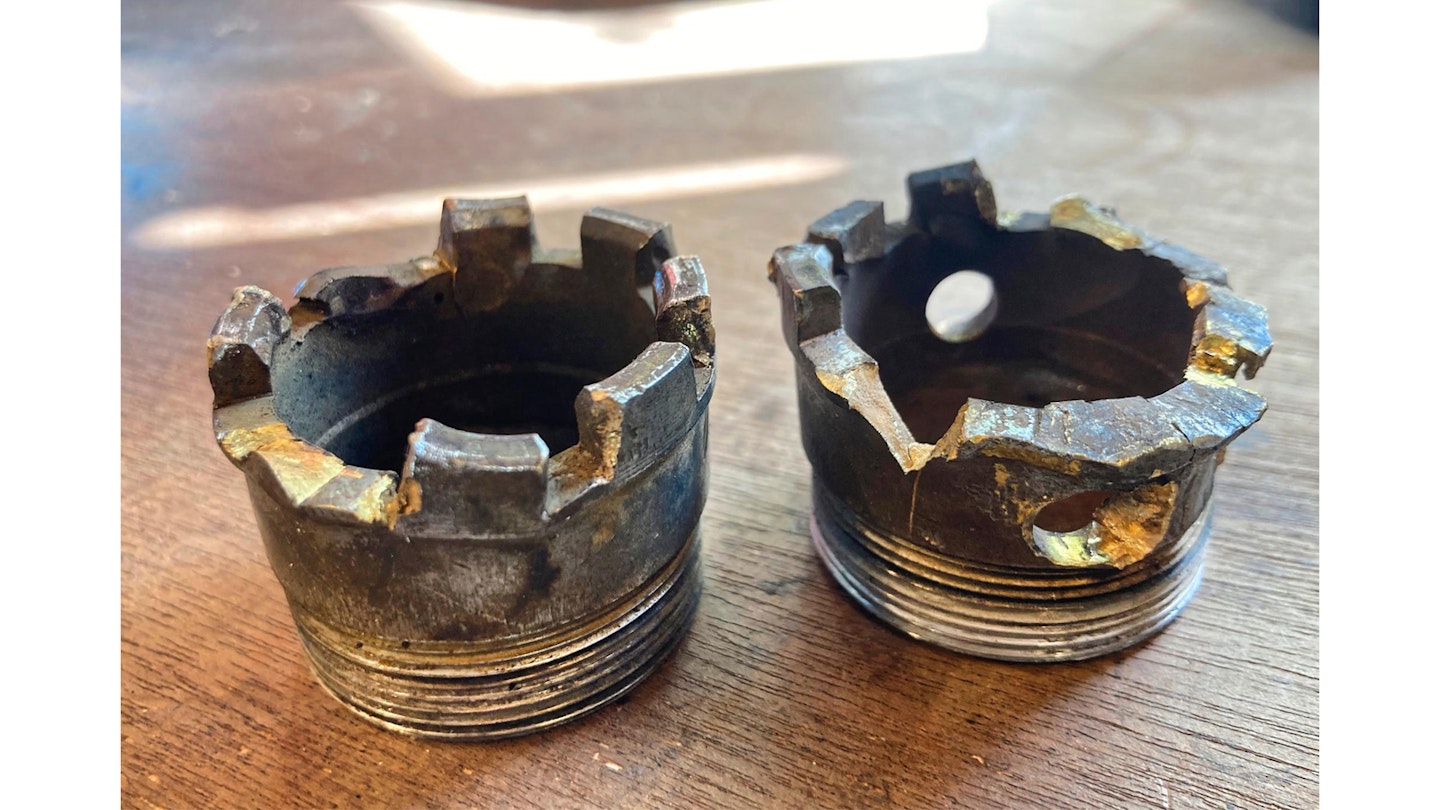
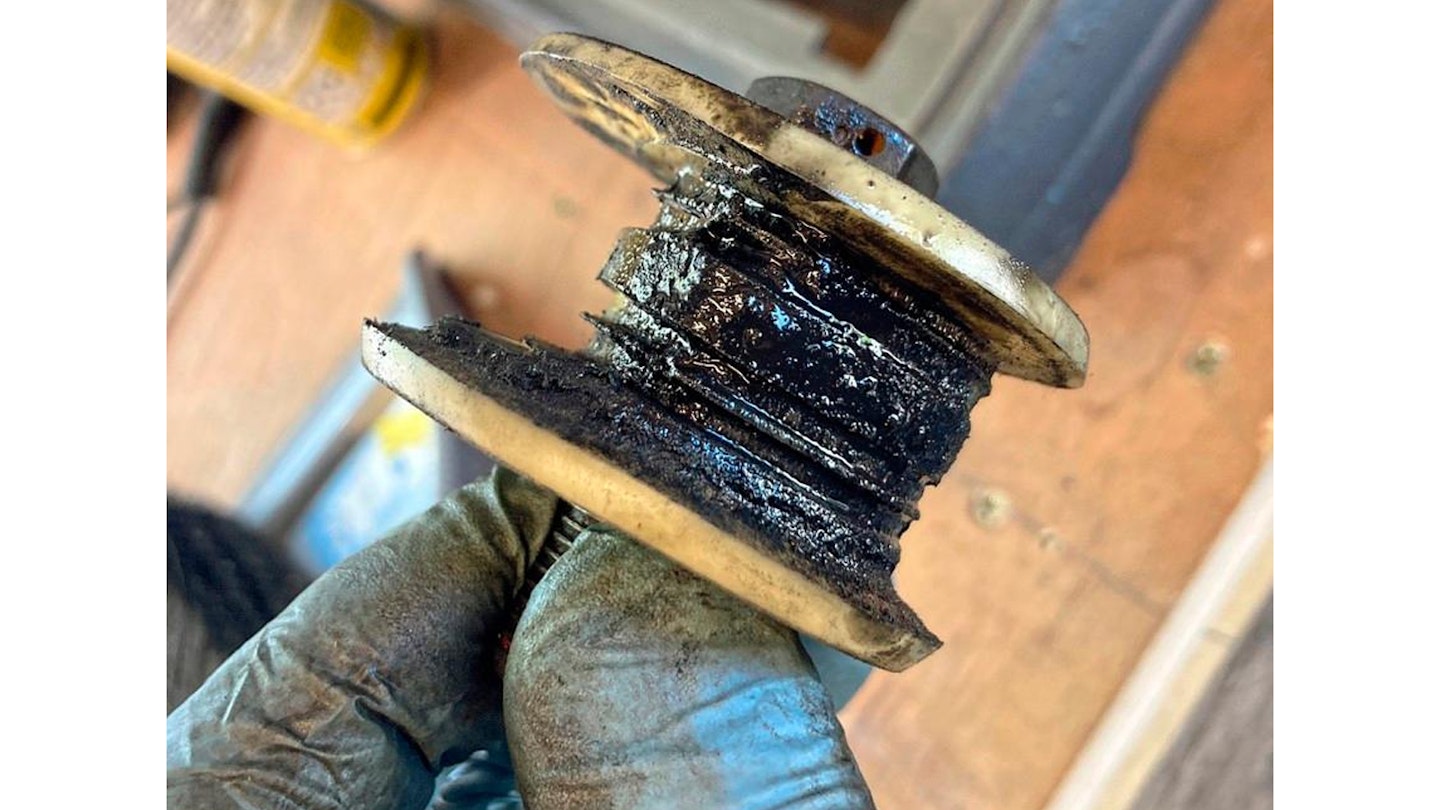
To show good will, I removed the carbs, airbox and valve gear. All child’s play on a Morini. I had then tried – and failed – to undo the crenellated exhaust retaining nuts. These things are bronze, in a pretty fine pitch, screwed into an aluminium head. Rupe suspects the pitch exacerbates the problem, which is that galvanic corrosion (plus years of neglect) turns the aluminium to mush, and causes the threads to bind.
He extracted the almost toothless rear nut with a lot of heat, penetrating fluid, time and the patient application of violence. The front wasn’t so easy. In the end, he told me to take the bike away, strip the head and exhaust complete, and bring them back.

Benjy had already vouchsafed to me a ‘last resort’ method – drill an 8mm hole through the nut, the exhaust and out the other side. Rupe fitted the head in a vice, hit the nut and exhaust with his air drill, and used a length of silver steel as a tommy bar. To this he applied a mixture of long bars, light taps and brutal hammer blows – all backed up with copious amounts of heat, penetrating fluid and time. Eventually, the nut let go.
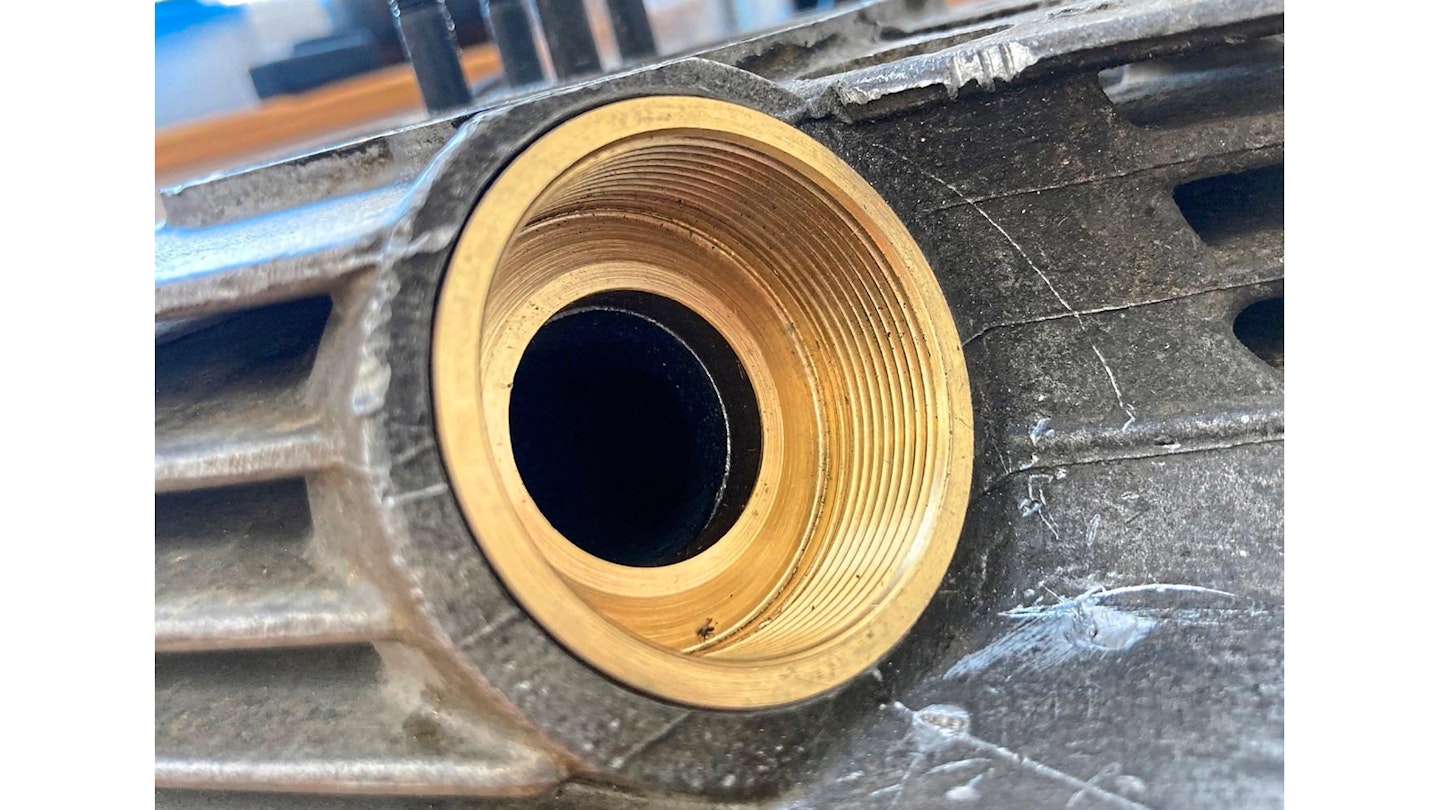
By now it was obvious that both exhaust nut threads were toast. Or would have been, if Benjy had not previously developed a beautiful fix: a bronze insert that gets the heads back to full functionality. Relieved,
I fished out the valves, washed the heads down and sent them off. I still had two 8mm holes in the exhaust pipe, but my mate Azza made short work of welding them up. His price: two packets of Haribos. I bought him a fruit cake as well.
With the pistons out in the fresh air, I could see evidence that supported Benjy’s diagnosis – the oil rings were gummed up. To be sure, I visited my old friend Andrew Scott, master fettler of classic Jaguars at The Splined Hub in Oundle, and owner of a set of bore gauges.
Andrew measured the piston-to-barrel clearance at 0.12mm. Max is 0.1mm. The ring gaps were even looser: 0.50.75mm. Clearly, I needed new everything. Unfortunately, the piston was 62.4mm, which is already the maximum oversize.
You can get ‘big bore’ 64mm pistons for the 350 Morini, but Benjy warned me that I wouldn’t like the vibes. Instead, he pointed me to Morini owner Ian Lucas, who had a set of plated Gilardoni barrels and good used pistons. Plated barrels are apparently quieter than my cast iron liners, and never wear out, so they were a no-brainer. To go with them, I ordered a top-end gasket set from Mdina Italia, plus new exhaust nuts, rings and gudgeon pin circlips.
Rupe Farnsworth put the engine together beautifully, and reassembled the carbs and airbox too. He claimed it was all a warranty job, even though it was his first time working on the bike. What can I say? I am surrounded by splendid people.
“The Morini factory manual is first class, and the new parts (plus a tube of Yamabond) resulted in a really pretty straightforward rebuild,” he reported. “I’ve not been inside a Morini motor before and was pleasantly surprised with what I found – simple, well-executed engineering design.” I think he means Morini were better than BSA. Which is unquestionably true.
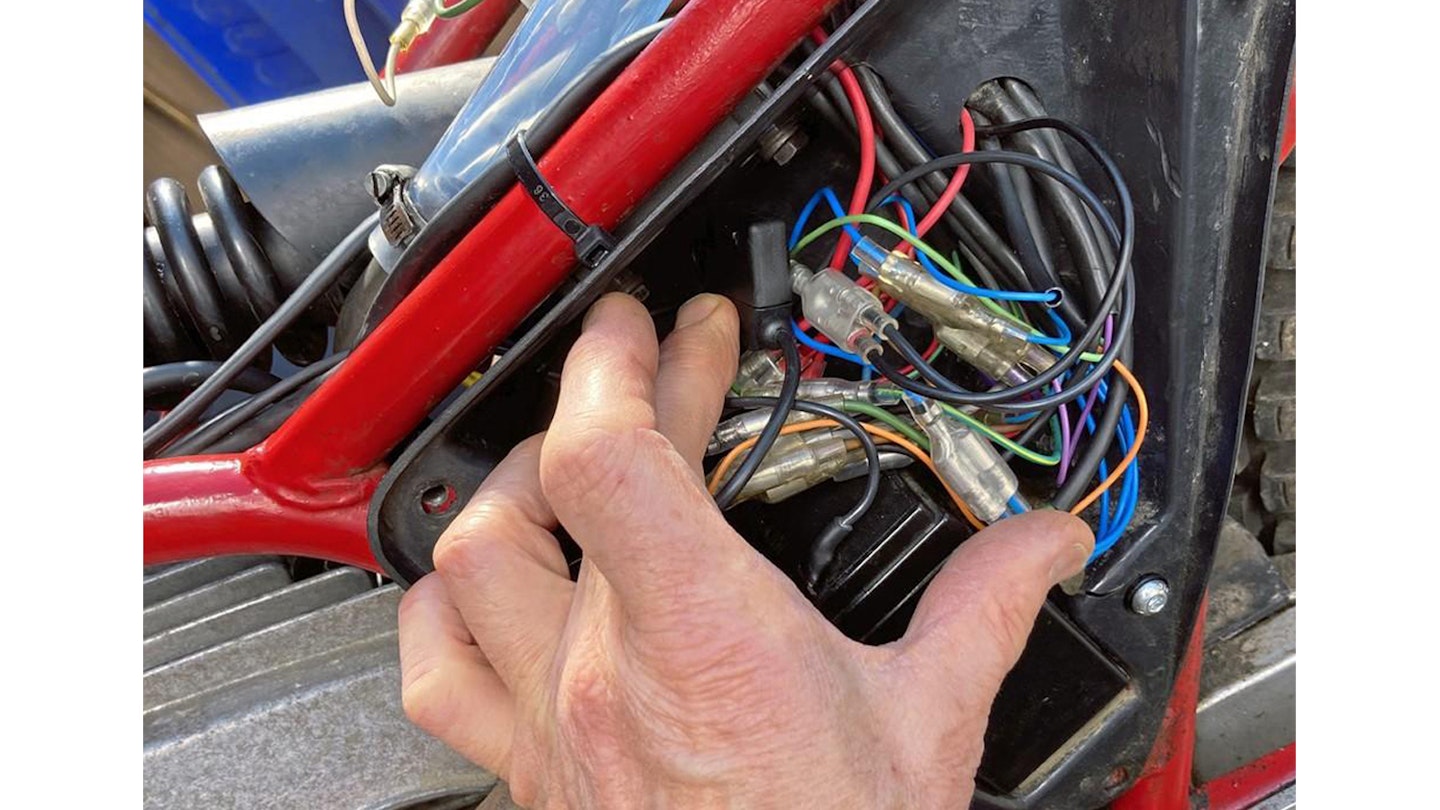
There was a further diversion, too. In the April issue, I’d claimed I had sorted out the wiring on the Kanguro – but there were more problems still to find. When I began to investigate removing the rear head and barrel, I was presented with an oily morass that hid a fresh horror – a bunch of wires so close to the rear header pipe they had melted together. It was a wonder the damn thing ran at all.

I hacked into the main loom, cut out the offending wires and replaced them with much longer pieces so I could avoid the route that took them close to the exhaust. Personally, I find grafting new wires onto old ones a satisfying procedure – it’s all about having the right kit. In this case, I used tin open barrel crimps from RS Components (part no 718-7640). The crimp tool is the TT72-F sold by Kojaycat, who also sell pretty handy brass open barrel crimps (for 1mm sq cable) that do a similar job. The new PVC sleeving comes from Hilltop Products. Other shops sell it too, but Hilltop’s is the best.
With all the time I eventually spent on the electrics, I could probably have built a new loom from scratch. But I didn’t know that when I started, which is what counts. As a result, the wires are bundled above the battery, Morini style. It’s not how I usually do it, you understand. But it works – and it will keep working.
The motor fired up instantly and smoked as profusely as before. This was hardly surprising – the exhaust system was caked internally in oily deposits. Within 50 miles, it was clear as a bell.
The oily morass behind the rear cylinder turned out to have been oozing from the crankcase breather hose, which had long ago gone hard and brittle. I replaced it with a fresh, supple one and so far it has done the trick.
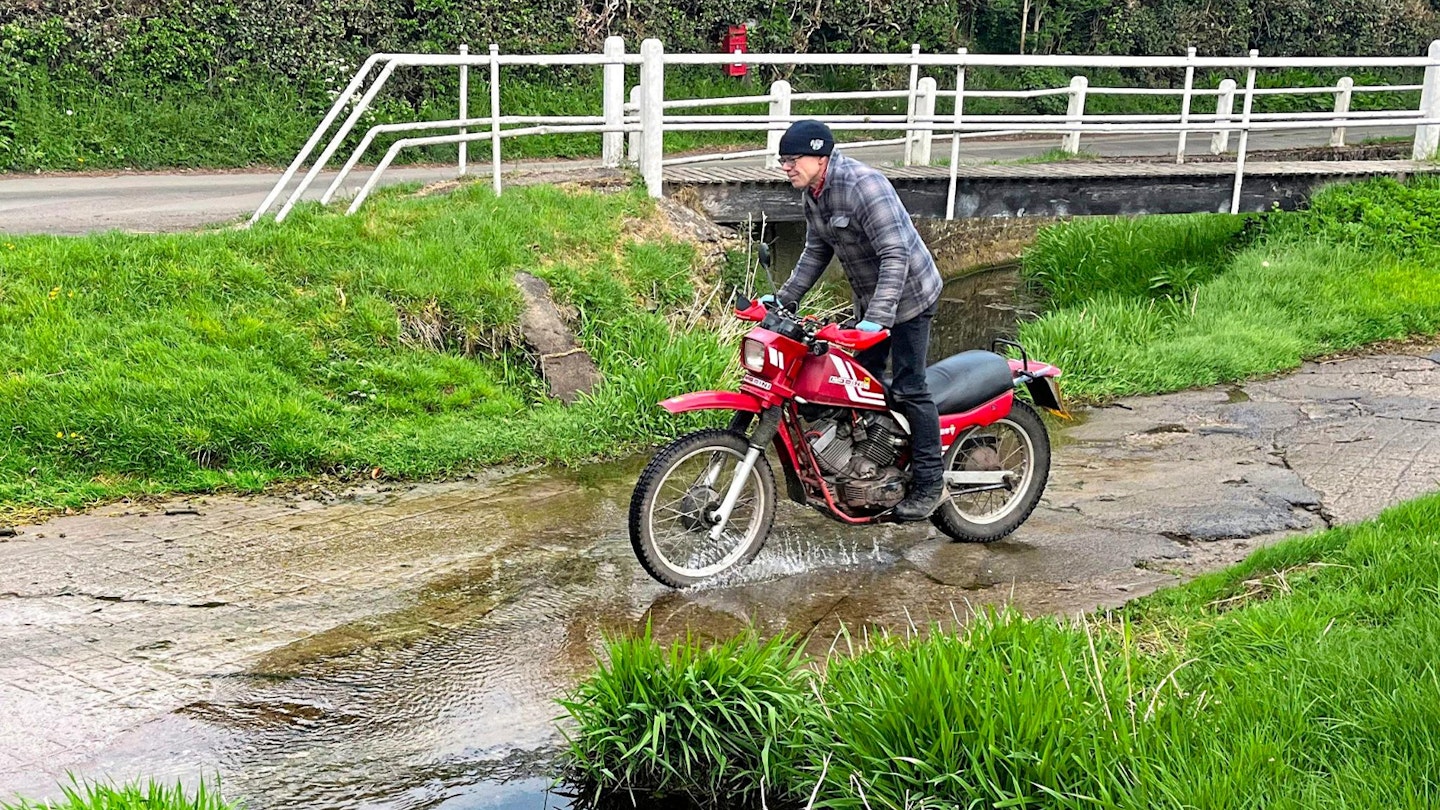
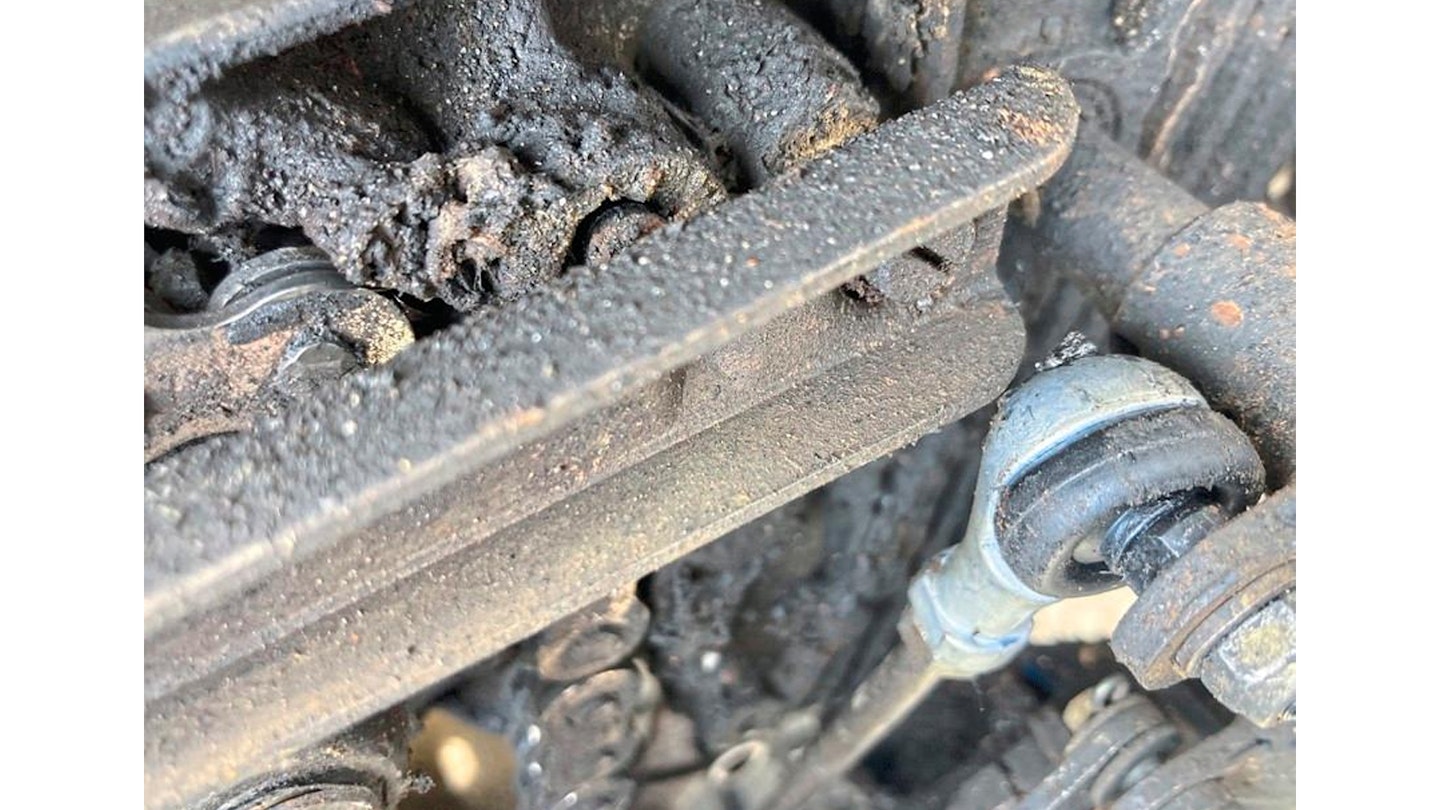
With the Land’s End Trial days away, I tried an extended test ride of two miles. The gearchange didn’t feel great. A check of the linkage showed why – the ball joints were seized and the crossover tube was worn. Worse still, the chain tension roller had seized and started wearing unevenly. With a day to go I could only put it back and free off/lubricate the ball joints.
Of the Trial itself, little needs to be said. Hours of heavy rain, plus fog over Exmoor. The gearchange was little better. After four and a half hours, I could no longer find first or neutral, and it was jumping out of second and fourth. I bailed out, limped 55 miles back to my sister’s place in Bridgwater and was tucked up in bed by 3.30am. Everyone else in my team, including Farnsworth and CB contributor John Westlake, finished at 2pm the following afternoon.
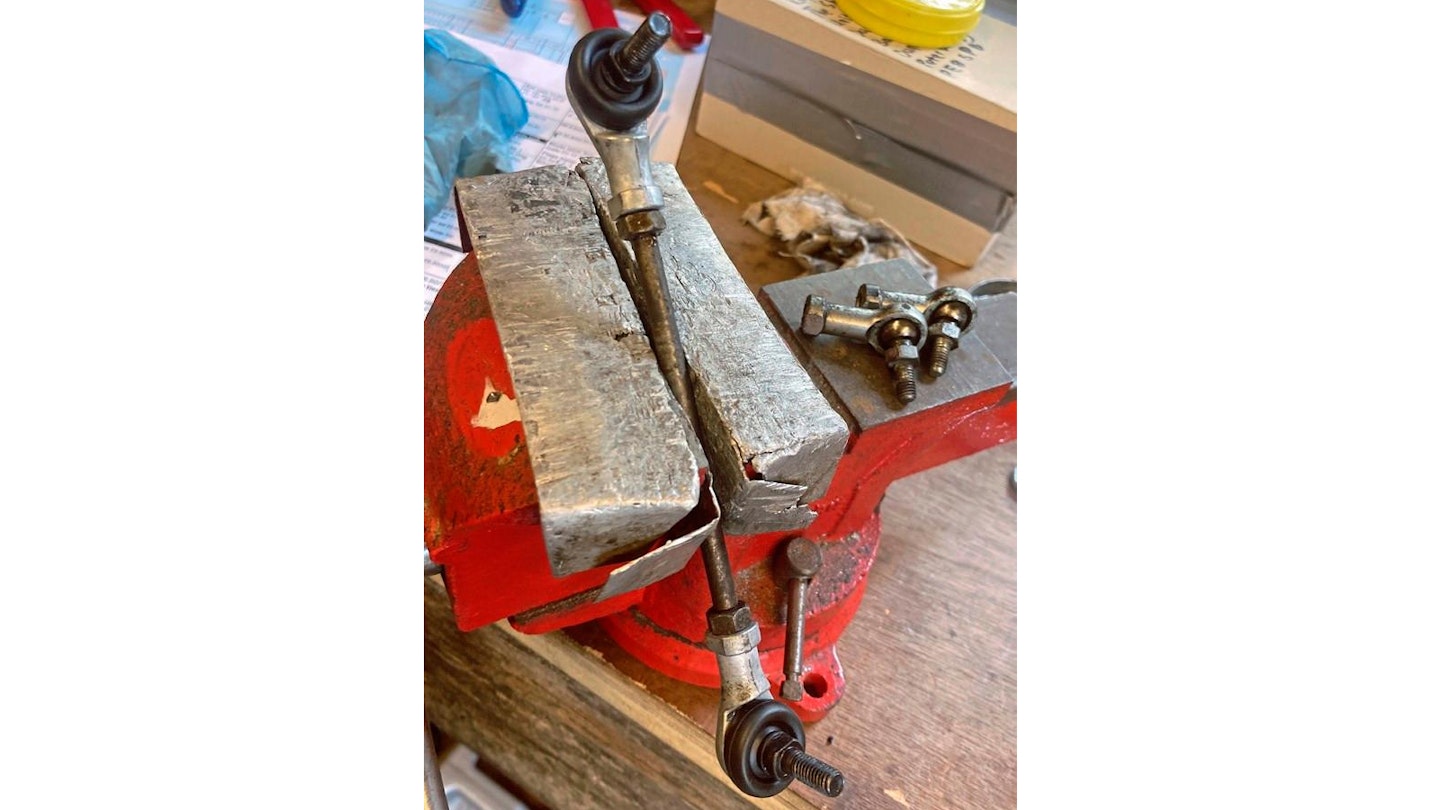
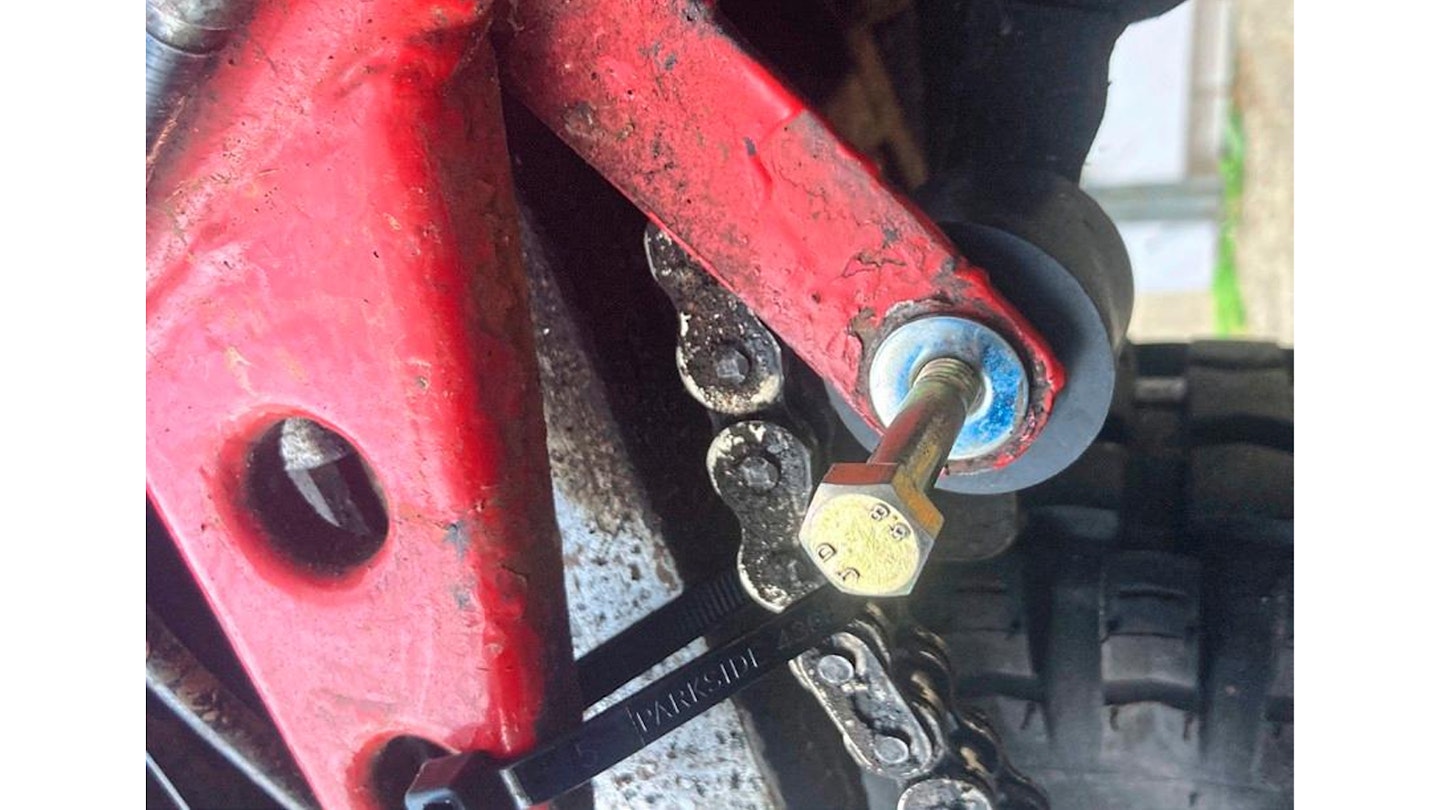
A few days later, I investigated the problem. The ball joints had tightened up again, but Benjy reckoned they would have been even worse after a couple of hours’ use. Apparently, nylon ball joints (which mine are) bind up when they get hot. I fitted some replacements with sealed bearings. The chain roller was a bit trickier; it uses a 10mm bolt, but the only decent rollers available are 8mm. Yet again, Benjy provided the solution: a reducing washer kit that turns a 10mm hole into an 8mm one. The washers arrived in the post with ‘A consolation prize’ written neatly on the bag. The new roller spins like a top.
A test ride revealed the gearchange was still useless. The bulkier front ball joint fouled the clutch actuator arm. I replaced it with the best of the old joints and tried again. Success. Except it’s still surprisingly hard to find neutral. Impossible from first; only with practice, and while still moving, from second. Which means I need to investigate the clutch for possible drag... before I go trail riding in France in six weeks’ time.
Useful contacts
-
Kojaycat – wiring supplies kojaycat.co.uk
-
Benjy Straw – Morini expertise straw.benjy@btinternet.com
-
Rupe rewires – electrical current rupesrewires.com
-
The Splined Hub – Jaguar restoration thesplinedhub.co.uk
The cost of blind faith
Some people shop around for months, weighing up one used bike against another. I prefer to wait until I’m inspired, pay the seller and hope for the best. You might think that’s not such a great approach, and I might agree with you. But it won’t stop me from doing it again.
-
Bike purchase price £1500
-
Factory manual £25
-
Morini Riders’ Club membership £26
-
Wires, crimps, terminals, sleeving £16 approx
-
BA20d LED headlight £12.88
-
Good used barrels and pistons £300
-
Cylinder head inserts £240
-
Rings and circlips £132.48
-
Gaskets and exhaust nuts £137.28
-
Three Bond sealant £20.10
-
Gear linkage ball joints £12.60
-
Chain roller £13.13
-
Total £2435.47
That’s a punchy £935 on top of the purchase price to get a rideable bike. Which will shortly need new tyres...