
I went to look at a vintage bike for a friend last month. The £23,000 asking price was high for this model, but reflected the fact that it was in very original, unrestored condition. The seller said the electrics had been done – and certainly the mag-dyno looked shiny and rebuilt and the wiring new. But while the bike started easily, turning on the lights registered a discharge on the ammeter. I tried a few revs and even cut the engine to make sure the needle still swung to discharge, in case the ammeter was reading backwards. “It’s not charging,” says I. “Just a flat battery,” says he. “No, I mean it isn’t charging,” I repeat. “Like I said, the battery’s flat; it needs to be charged up!” he retorted, as if I was a simpleton. Tempers simmered... the lights worked, so the battery wasn’t flat; the ammeter reading showed the dynamo wasn’t producing current. When I bluntly suggested he get a meter and I’d show him he was wrong, he snapped: “You’ve annoyed me now,” pushed the bike back in his shop and shut the door.
Maybe it was a lucky escape. I mean, for £23,000 wouldn’t you expect the lights to work? It was probably just the rusty voltage regulator under the seat at fault, but I can’t imagine this bloke being too hot on providing any aftersales care... But maybe I was being unfair. I may well have come across as just a time waster. I mean, if you can truly afford a £23,000 bike you can probably find another 50 quid for a regulator. It was a small problem on an otherwise very nice machine – and that set me thinking.
Original paint is now so highly prized that demand has created a seller’s market. But ‘unrestored’ means exactly that; what you are paying for is largely cosmetic, don’t be fooled into thinking an unrestored bike will be mechanically perfect, it may need a lot of effort to make it as faithful as it looks. After all, it’s had a long life; it’s unlikely to be just the paintwork that’s worn.
The Big Fix
Pattern parts: Component scanning and rapid prototyping is still the preserve of the experts
John Smitherman asks for details of the company who are making the patterns for my Martinsyde cylinder head (Fixes December), as he needs one cast for his 1934 BSA W34/12 Sloper. Ah, now... this is a bigger deal that I’ve maybe made clear. Initially, I naively thought perhaps I could make the patterns myself, with guidance from my clever mate Bruce, but soon realised it was way out of my league and Bruce very kindly took over. Without his help, it would have been completely impossible – patterns this complex normally cost thousands.

Although scanning and rapid prototyping are helpful, at present they only copy what is there. The plastic head we had ‘printed’ is a model of Bruce’s redesign of an original head, giving him a 3D example of what’s needed from which to design the pattern. The next step is for Bruce to design and make patterns to produce a casting of that plastic model. These will need to be in several interlocking pieces, like a Chinese puzzle – solid enough to withstand the sand being rammed around them, but readily dismantled for removal from the sand without disturbing the imprint. It’s a complex task; Bruce has been at it for over a year now, and we’re only doing it because Chris Tait only managed to find two sets of Quick Six top ends in 70 years and neither of them are available.
For John’s BSA, I don’t think casting is viable. There must be useable barrels and heads out there somewhere – I even wonder if something like a BSA M20 top end could be adapted to work; it shares John’s bike’s 85mm bore. Meanwhile, if anyone has a barrel and head for a 1935 550cc BSA Sloper, let me know; you could make John a very happy man!
Top tips - anti-chafing advice and crank seal correction
A bit more cable
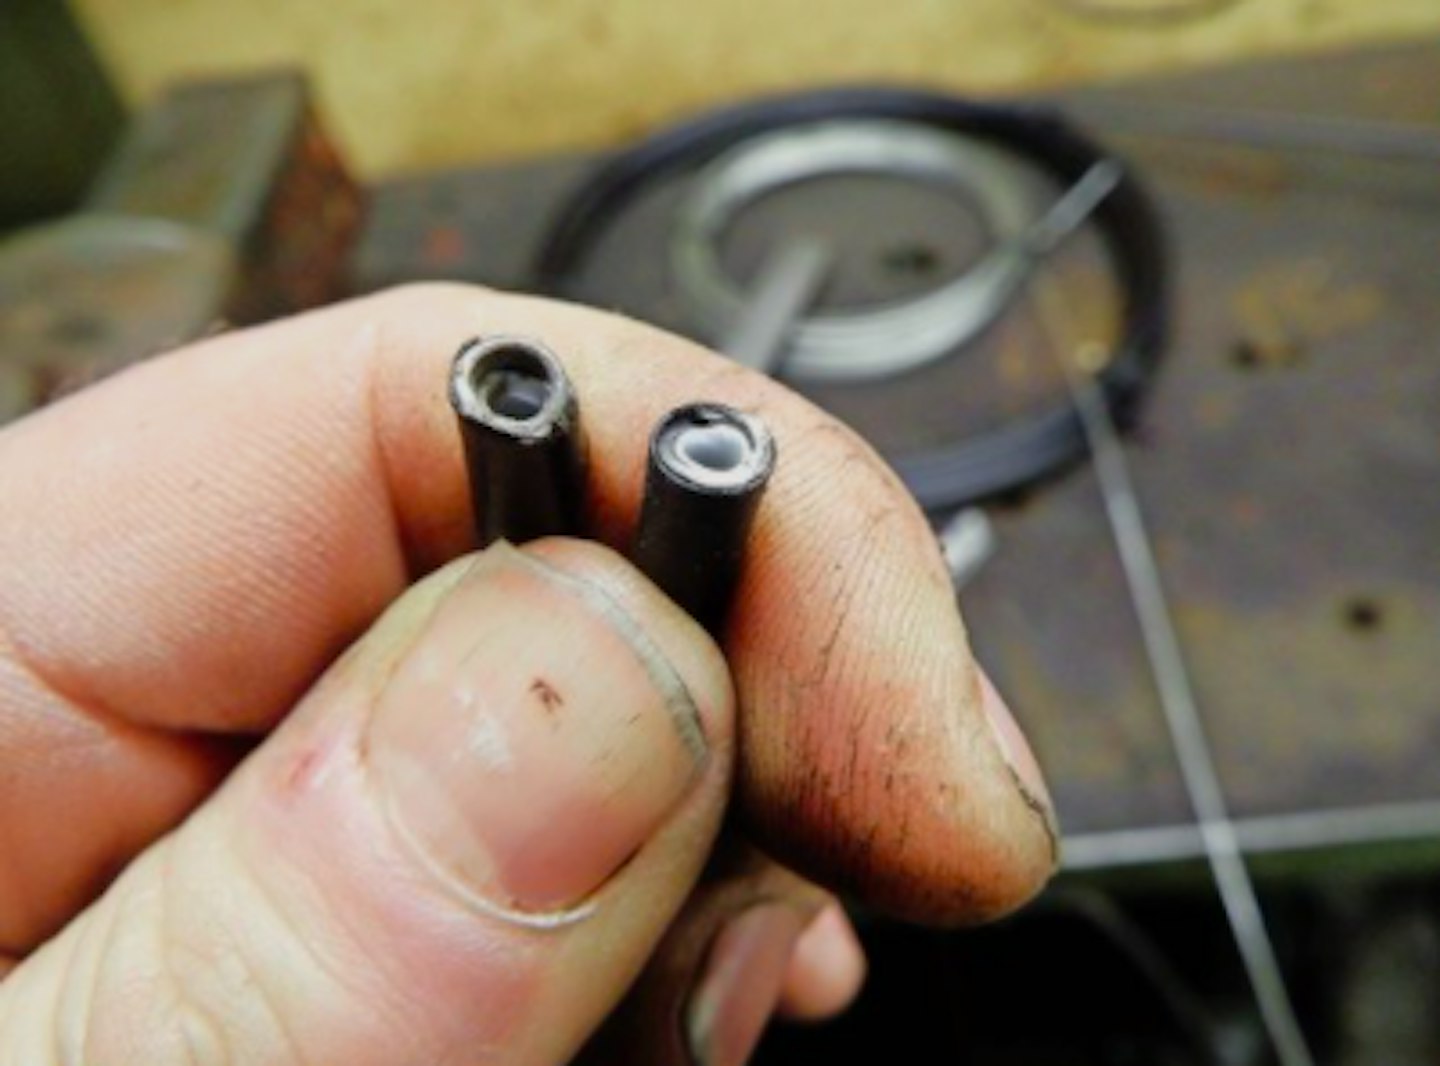
Good suggestion from Adam Overton-Hore, who adds to my cable-making feature that he finds it is always worth filing the cut end of the outer cable to ensure it has a flat end. He says if not, even when using a ferrule on the end, the outer doesn’t sit squarely in the lever causing inner wire chafing and fraying.
Sealed with a miss
Triumph specialist Terry McDonald says it’s me that fitted the Triumph crank seal the wrong way round, not the previous builder (Fixes, November). The lip of the seal on a unit 650 must face outward, otherwise it doesn’t reach the sprocket. He says the reason it was rubbing on the bearing is because it had been pressed in too far. My TR6 has been running with the seal in the wrong way round for the past 20 years, so I guess it’s not too critical – but I’ll change it next time it’s apart. Thanks Terry.
In the balance
Karl Chadwick has a Honda CB500T with a rot-prone exhaust. He wants to know if he can do without the exhaust collector box that sits between the downpipes in the firing line for spray from the front wheel. “The CB450 didn’t have one,” he says. “I’ve got new pipes and I’m thinking of getting the stubs removed and the holes patched and rechromed.” I contacted Motad who have been making quality aftermarket exhausts for ages – including ones for balance-box equipped bikes like the CB250N and CX500. Ian at Motad said: “We’ve looked into this, and if you try to do away with the box you knock the bottom out of the midrange power.” Of course, Motad’s systems for the ’80s twins were two-into-one, which may have altered the situation, but you still have to accept the lack of a box on the CB450. Maybe it’s something that could be tackled by adjusting carburation? I think my approach would be to block off the old, existing pipes and try it first, before modifying the new ones. Alternatively, Karl said he could always add a simple balance pipe. Be interesting to see what he discovers.
Flood warning

Jean-Pierre Ravay is having problems with the Amal carb on his 1931 AJS Model S6. He says: “The needle is not closing the fuel supply and it runs everywhere!” The needle Jean-Pierre refers to will be the float needle, which has a tapered end that rises with the float into a jet, cutting off the fuel supply at a certain level. As the engine uses the fuel, the float drops and more fuel is admitted. It’s a simple system, but suffers from two problems. The first is simply dirt. If a particle of grit lodges in the jet it can hold the needle off its seating; then, because the fuel supply cannot be cut off, the float doesn’t fall and the particle remains jammed in the jet. Usually vigorous rattling of the ‘tickler’ button (used to manually flood the carb for starting by holding the float down) will lower the flat enough to allow the incoming fuel to wash the grit away. Failing that, the float bowl needs to be dismantled. The other cause of flooding is wear or damage. Original floats were soldered-together copper pressings and any leaks will allow fuel to get inside, affecting buoyancy. At worst the float stops floating and flooding occurs. Even a small leak alters the float height and thus mixture, so it’s worth shaking the float and listening; expect to hear a bit of stray solder rattling about but any ‘swishing’ sounds mean trouble and the need for a new float. They can be repaired, but any extra solder will affect the weight, so it’s not usually practical. The other common problem is wear on the taper of the float needle. There is a cone on the bottom and this ends up with concave sides over time. You can buy new ones from Burlen Fuel Systems (01722 412500) who can supply new floats (in fuel-resistant plastic) and new needles. A float and needle kit costs just over £25.
Pipe problem
Wayne Smith has a BMW R900T. A previous owner has left fingerprints on the chrome downpipes and Wayne is struggling to remove them.He asks if I know a way to get them off and if not, whether it’s possible to rechrome the twin-pipe set-up with balance pipe, welded as a single unit. I find Solvol Autosol very good for removing stains from chrome plating but it is wise to try a concealed area first – if the chrome is poor, the polish can dull the finish. If necessary, rechroming the pipe shouldn’t be a problem. I spoke to Adam at Ashford Plating (01233 841877), who said they’d be able to handle it. Adam explained that not all platers will tackle exhausts as it requires a special cleaning process to remove the exhaust residues from the inside – which could pollute the plating bath. As regards the welded construction, he didn’t see any problem other than the fact that sharp corners don’t plate well and chrome cannot disguise undressed welds, but the original plating would have been the same. I also asked Adam about the future of chrome plating in the UK. He agreed that tightening regulations make it difficult, but thinks that it will still be possible to offer a chroming service into the future. But it’s something I’d get done sooner rather than later, if I was you.
Tank battle

After denting the tank on his 1959 BSA B31, Alan Wood was pleased to find tanks from India at competitive prices on the internet. But as they’re only listed for the twincylinder A10 and A7 models, he asks if they will fit. Well, the BSA twin and single centre bolt tanks are interchangeable and although I have no personal experience of these tanks, I have been told that being essentially handmade, some are better than others and initially there were some problems with the dimensions. That said, they have been in production for some time now and I haven’t heard any complaints recently, so maybe everything is now sorted. But buying from abroad over the internet can be a gamble and there may be little comeback if the tank isn’t what you had hoped for. The ideal option would be to have the original tank repaired – specialists would cut out the bottom, knock out the dent, weld it back up and refinish – but it will be more expensive. The choice is yours Alan, tell us how you get on...
How to strip a BSA stop-switch

- This Lucas 31383 stop-switch worked last time I used it, so hopefully it’s an easy fix. The first job is to carefully prise back the four bent-over tabs holding it together.

- These switches are pretty simple, with nothing much to go wrong. Corrosion is the most likely problem, as here – the brass contacts are dull and coated with verdigris.

- A good scrub over with wire wool soon brings back the shine to the surface and a thin smear of Vaseline will help keep damp at bay. Don’t use copper grease, it’ll cause shorts.

- Seal box with a dab of silicone gasket then carefully fold over tabs. Check with a meter set to ohms (resistance) over the terminals. Zero when the switch is pulled; perfect.
He asks if I know a way to get them off and if not, whether it’s possible to rechrome the twin-pipe set-up with balance pipe, welded as a single unit. I find Solvol Autosol very good for removing stains from chrome plating but it is wise to try a concealed area first – if the chrome is poor, the polish can dull the finish. If necessary, rechroming the pipe shouldn’t be a problem. I spoke to Adam at Ashford Plating (01233 841877), who said they’d be able to handle it. Adam explained that not all platers will tackle exhausts as it requires a special cleaning process to remove the exhaust residues from the inside – which could pollute the plating bath. As regards the welded construction, he didn’t see any problem other than the fact that sharp corners don’t plate well and chrome cannot disguise undressed welds, but the original plating would have been the same. I also asked Adam about the future of chrome plating in the UK. He agreed that tightening regulations make it difficult, but thinks that it will still be possible to offer a chroming service into the future. But it’s something I’d get done sooner rather than later, if I was you.
If you’re getting someone to fix your precious vintage components, make sure it’s a competent craftsman
Why would anyone take a pretty sound vintage tank and weld on a stainless base, with no mounting holes or tap bosses and without bothering to seal the bulkhead between the main tank and the oil compartment at the front? The hacked hole is an investigation of the bulkhead issue and it all points to one thing – a leak or split in the base led to someone falling for that fateful line: “A mate of mine’ll sort that for you...” It’s a communication problem. Ask a welder to ‘stick a new bottom on this’ and he will grab a bit of sheet metal and tosh it on. But ask him to replicate the original base, transferring the fittings to exactly the right positions and to de-solder the front panel in order to seal the internal joint between oil and petrol compartments.

Add that the tank is soldered, not welded, and irreplaceable and he will either do it right or (more probably) tell you to take it away. Either would have been better than this – if this tank can be saved at all, it will now entail a whole lot of work. Just because someone can do something you can’t – like welding – doesn’t automatically make them right for the job, but when you’re out of your own depth, how can you tell those swimming from those just splashing about? Irreplaceable items deserve specialist attention and however expensive that may be, it’ll be nothing compared to putting right someone else’s failed attempt.